
Imagemaps, Cropping, Resizing, and Image Slicing
1) Create a link "Imagemap Exercise" from your home page to a page which contains the above two images. Put the images on your computer and site; do not remote link them.
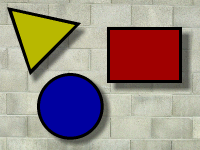
2) Create an imagemap with the image on the left, so that clicking on the triangle will take you to your Homework 1 (Linking Exercise), clicking the circle will take you to your Homework 2 (Text and Image Links Exercise), and clicking the rectangle will take you to your Homework 3 (Table Exercise).
3) Create an imagemap with the image on the right so that
clicking on the upper left quadrant (New York) will take you to your Homework 1
clicking on the upper right quadrant ("Chicago") will take you to your Homework 2
clicking the lower left quadrant ("Sydney") will take you to your Homework 3
clicking the lower right quadrant (Los Angeles) will take you to www.erols.com/wpegram (the instructor's home page)
You can make the shapes for the second imagemap simply (triangle or rectangle); you do not need to try to approximate the circle using a polygon, although you are welcome to do so.
4) Slice the right graphic into 4 parts -- use a graphics program for this, and then put the 4 images together in a table so that the image looks like it does above. Make each of the 4 images into a link so that it behaves like the imagemap in step 3. (However you will have 4 images that are links, not an imagemap). Do HEIGHT, WIDTH, and ALT tags for each of the 4 graphics. Do not worry if you haven't sliced the image perfectly.
When you are done with all parts of the assignment, you will have what will LOOK like 3 images on the site, one copy of the left image above and two copies of the right image above.
FTP the files, including all 6 graphics files, to your site.
You will need to use Fireworks, IrfanView, Paint, Photo Editor, Photoshop, or some other graphics program for two parts of this assignment: to determine the coordinates for the imagemap and to do graphic slicing. Fireworks, made by Macromedia, is available in the open lab in the Annandale CT building and some classrooms. The educational price is $99 for Fireworks MX alone or $199 for Studio MX, which includes Dreamweaver MX, Flash MX, Freehand 10, and Fireworks MX. One can download a 30 day trial version from the Macromedia web site. IrfanView is a free graphics program that you can download. Paint ships with Windows. Photo Editor ships with Office 97 and 2000, however at least with Office 2000, it is not installed by default so if you don't have it, get your Office CD and install this program. Photoshop is available in the graphics classroom off CG114 (Annandale); the academic price is about $270. A more limited version, Photoshop Elements, is available commercially for under $100.
Obtaining coordinates:
Fireworks - If the Info palette is now showing, click on Window, Show Info. As one moves cursor over the mage, the Info palette will display the coordinates (same as Photoshop).
IrfanView - Click with mouse and watch title bar (blue bar at top) for display of coordinates
Paint - Click Select Tool (rectangular box in top row) and watch lower right for display of coordinates
PhotoEditor - Move mouse around and watch status line (at lower left) for display of coordinates
Photoshop - If the Info palette is not showing, click on Window, Show Info. As one moves cursor over the image, the Info palette will display the coordinates.
Cropping an image:
Fireworks - Select Rectangular Marquee Tool (rectangle tool second line on left) and click in the image and move cursor to outline the desired rectangle. Select Edit Copy, then File New, then Edit Paste. (same as Photoshop)
IrfanView - 1) Click in the image and move your cursor to outline the rectangle you want. Select Edit Crop, and then save under a new filename.
Paint - 1) Click Select Tool on the toolbar. Click in the image and move your cursor to outline the rectangle you want. You will see "marching ants" around the rectangle. Select Edit Copy to, and save under a new filename. Because you will only be able to a bitmap (.bmp file) and .bmp files will not show up in Netscape, you may then want to open up the .bmp file and save it as a .gif or .jpg. The reason to use this procedure rather than File, New, then Edit, Paste and save file under new filename, is that under that procedure the size of the new image is larger than the rectangle you have selected.
PhotoEditor - One can select the cropping area either visually or numerically. To select it visually:
1) Click on the select tool on the toolbar. Click in the image and move cursor to outline the desired rectangle. You will see "marching ants" around the rectangle. If you don't see them, you may have initially clicked outside of the image, so it may be easier to start on the inside and move out.To select the cropping area numerically and to specify additional cropping alternatives, on the menu select Image, Crop.
2) Select Edit, Copy then Edit, Paste as New Image. Save the new image under a new filename (don't overwrite your original image!). If prompted for options, save as a gif, 256 colors, 72 dpi.
Photoshop - Select Rectangular Marquee Tool (rectangle tool at upper left) and click in the image and move cursor to outline the desired rectangle. Select Edit Copy, then File New, then Edit Paste.
Resizing an image
(not required for this assignment but commonly done for web pages):Fireworks - Modify, then Image Size
IrfanView - Image, then Resize/Resample
Paint - Image, then Stretch/Skew
PhotoEditor - Image, then Resize
Photoshop - Image, then Image SizeGraphic Slicing
Graphic slicing consists of slicing an image into parts, saving each part under a different file name, and then creating a table in HTML that displays these parts so that it looks like the original image. ImageReady (now part of Photoshop) and Fireworks can do this for you, but you can also do it by hand. For the latter, one crops the image into various parts and then codes a table. ImageReady is able to create a table that looks the same as the original by specifying <table border=0 cellspacing=0 cellpadding=0> and a width specification that is equal to the sum of the width specifications of the columns. If this is not sufficient when you code it by hand, here are some additional things to do:
1) Do not leave any blank spaces between <td></td> tags. If you want to need to break a link, make the break within the <img> or <a> tag, not outside of it.
2) If the graphics in a column are almost the same size, use the width attribute of the <td> and <img> tags to make them equal.
3) Specify table height to be equal to the sum of the image height and cell heights.
Revised: July 11, 2002. Comments to wpegram@nvcc.edu