Animate
- In 2016, Adobe Flash CC was renamed Adobe Animate CC.
- In Animate 2023, File>New presents you with a screen with a number of choices at the top:
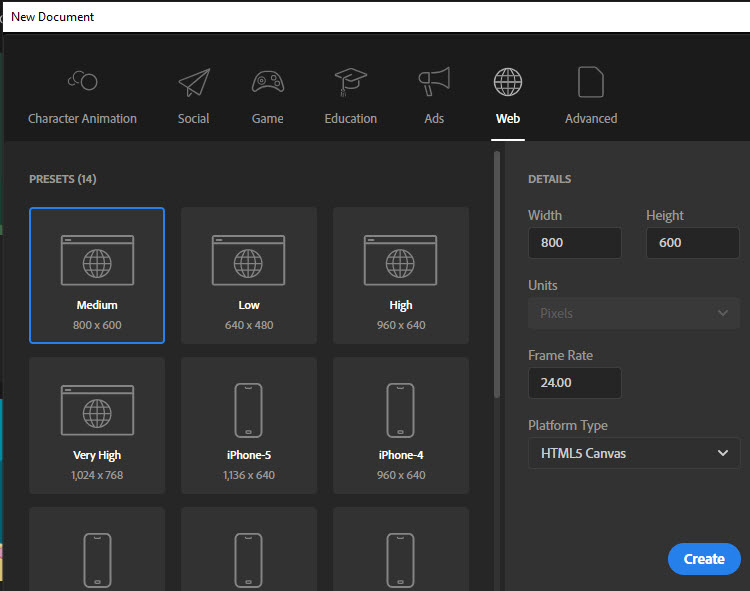
- there are seven choices at the top - we'll choose web since that's where we intend to put our animation
- in the web choice (which is selected), we have 14 presets (the first nine are shown above- the choice of presets determines the the width and height of the movie (the details section at the right). The default platform type is HTML5 Canvas and the default frame rate 24 frames per second. You can change the dimensions, the platform type, and the frames per second
- Platform type - For web, the choice is between HTML5 Canvas and ActionScript 3.0 with a default of HTML5 Canvas for all of the 14 presets.
- HTML5 Canvas - Widely supported on desktops and mobile devices - uses HTML5 and JavaScript and runs in a web browser. The HTML5 Canvas format was introduced into Flash/Animate to address the fact that support for the .swf format (the previous format) was discontinued about 2011 or 2012 in mobile, first in Apple and then in Android..
- ActionScript 3.0 - ActionScript 3.0 is a scripting language which is similar to Java. The ActionScript 3.0 format in Flash/Animate can export to a variety of formats including .swf and image formats (.gif, .jpg. and .png). Support for the .swf format in major browsers ended at the end of 2020.
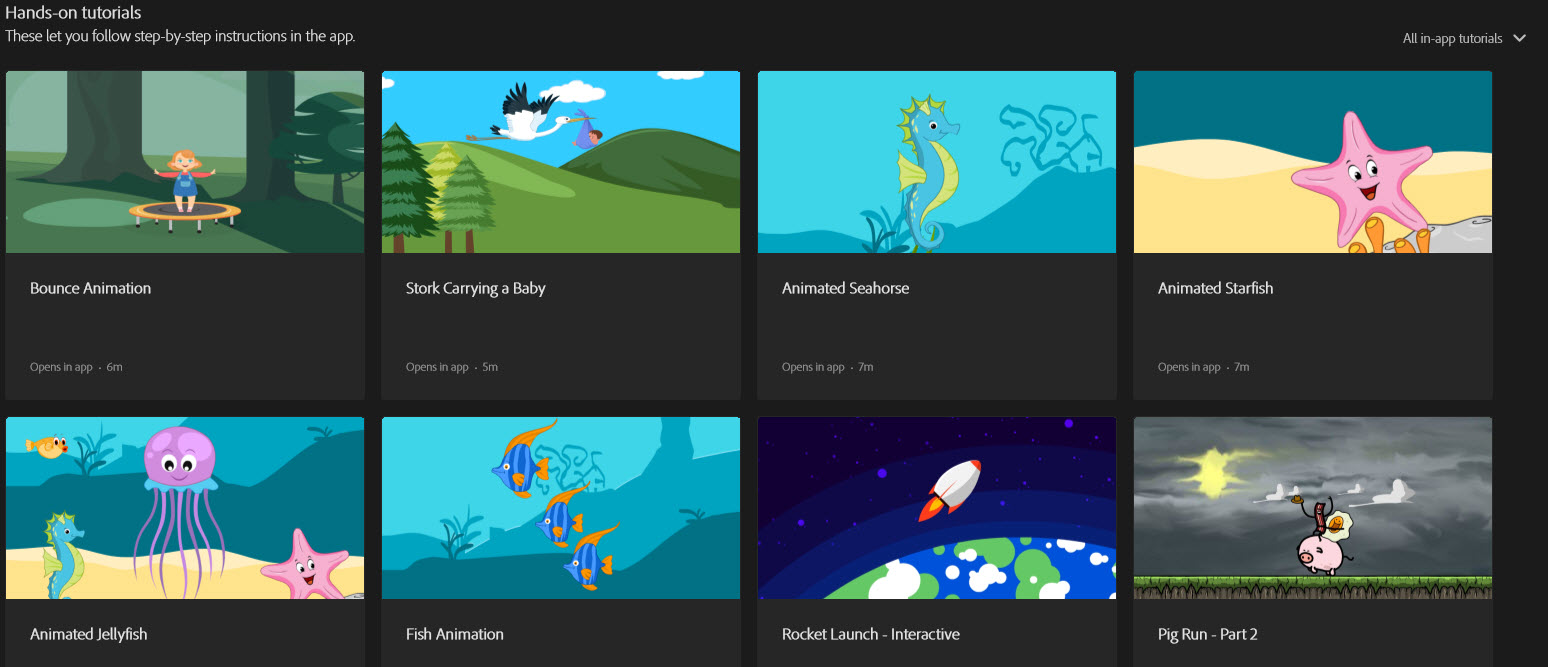
- 19 tutorials - these are pre-built animations you can play or modify - we won't be using these - eight are shown in the image below
- So go ahead and choose the dimensions, the frame rate, and the platform type to start with a new movie.
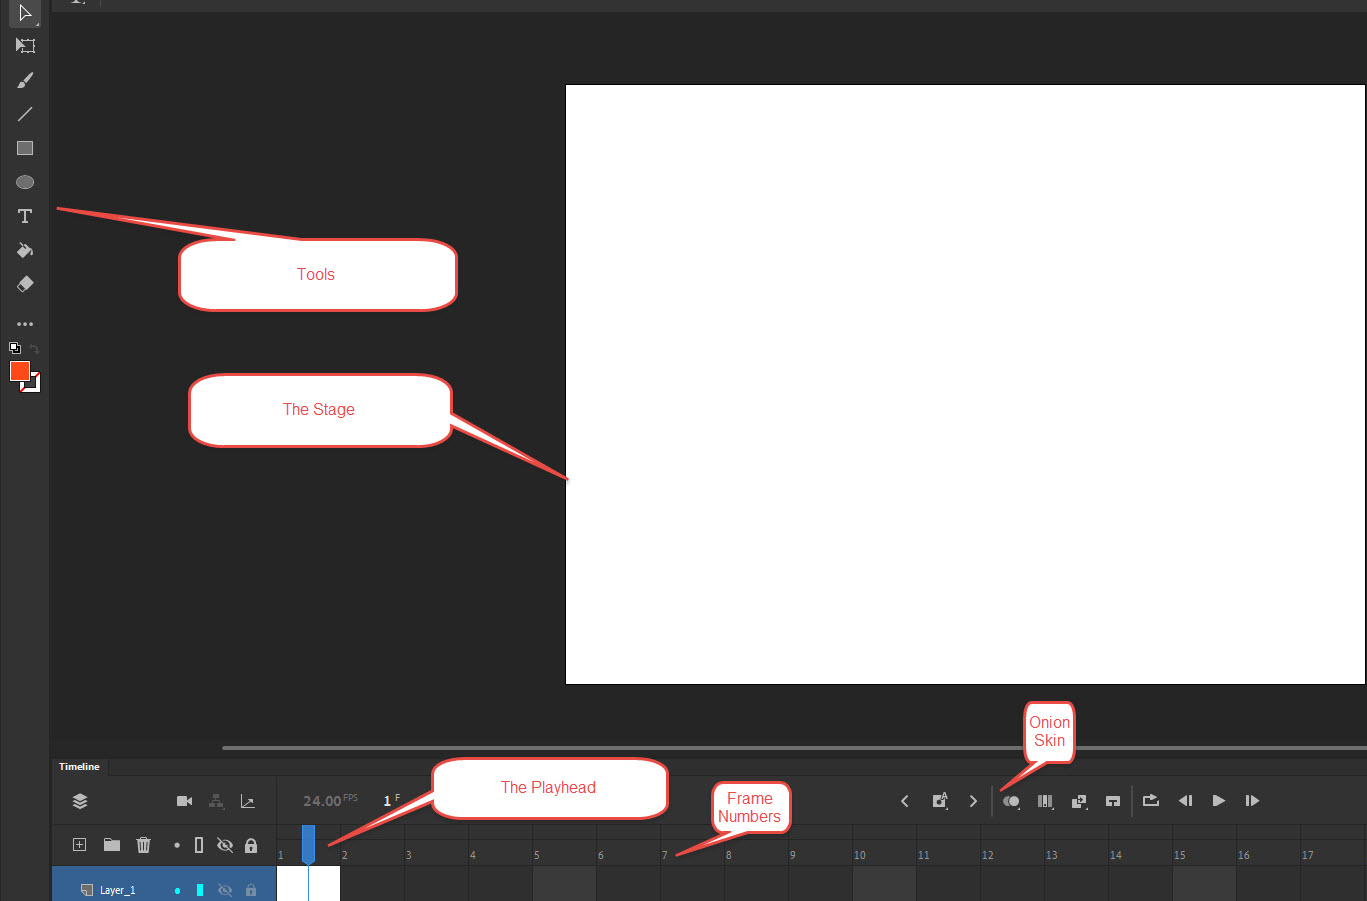
- Animate interface - The Tools appear at the left, the Timeline at the bottom. The rectangular area in the middle (the Stage) defines what is visible in the movie at that frame. The current frame is specified by the blue arrow at the bottom (called the playhead). If an object is off the Stage in the current frame, it is not visible in the movie in that frame.
- Layers - if a layer is above another in the list of layers, the contents
of that layer will be in front of the contents of the other layers in the movie.
Animate Drawing Tools
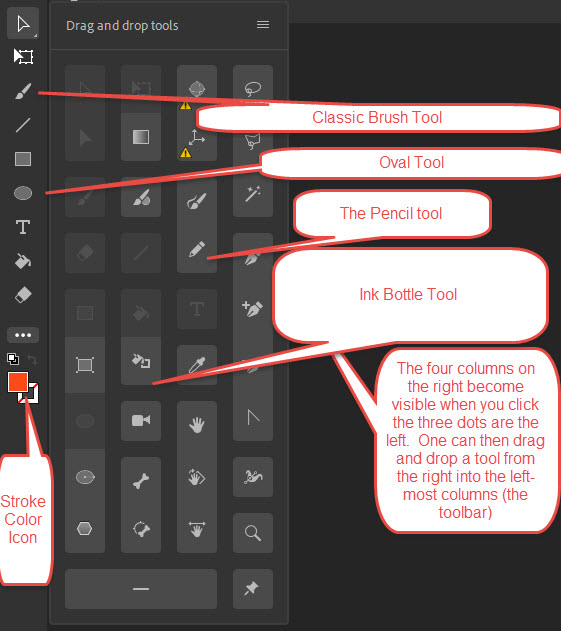
In addition to the tools showing in the toolbar, others can be added to the toolbar by clicking the three dots at the bottom (Edit Toolbar) and dragging the desired tool to the desired position on the toolbar as shown below.
Stroke Only Drawing Tools
Exercise 1 - Drawing with the Pencil Tool - If the Pencil tool is not showing on the Toolbar, click the three dots (Edit Toolbar) and click on the Pencil Tool at the right and drag it onto the Toolbar anywhere above the three dots.
If the Properties panel isn't open, select Window>Properties. To select a color, click the rectangle to the left of the word "Stroke" to bring up the palette. You can select a color by clicking with the eyedropper or by entering a hexadecimal value for the color. Instead of entering a hexadecimal value, you can click the colored circle at the top right of the panel. This will allow you to specify the color using a color picker, or by specifying the color with RGB or HSB (Hue, Saturation, and Brightness). You can set other properties such as stroke width or style. The stroke width does not have to be uniform. Draw a stroke. Ctrl A will select everything on the stage and then you can hit the delete
key to delete everything.
Exercise 2 - Using the Line Tool and Modifying Strokes - Click on the Line Tool and draw a line. Draw other lines to form a closed shape.
Now we will set some other stroke properties. Use the Selection Tool (top tool on the left) to select a line.
- Stroke style (Hairline, Solid, Dashed, Dotted, Ragged, Stippled, and Hatched - these style names appear as tooltips when you cursor over the choices in the Properties panel.
- Cap - sets the way a solid or hairline stroke ends - to see this, set the stroke size to be large, say 15 and select one of the three cap icons at the left in the Properties panel.
To change an existing stroke, choose the Selection Tool (at the top of the toolbar in Animate 2023) and then click on the stroke. The stroke will appear thicker
and a dotted pattern appear over it, both indicating it has been selected. You can now change, for example, the color of the stroke in the Properties panel.
- Using the Selection tool, move the cursor over a line in the closed shape. As you move over the line, a small curved line appears -- this indicates
you are over a stroke
- Click on a line segment - notice that only this line segment is selected;
if you double click on any line segment, all the connected line segments are selected. Once something is selected, you can move it just by dragging it
- Using the selection tool, if you approach a stroke, you will see a curved line, if you click and drag, you will change the shape of the existing stroke. But if you click on the stroke and select it, dragging will then move the stroke without changing its shape.
- Select the Ink Bottle tool (see the diagram above). Before we selected a stroke using the Selection Tool and then modified it in the Properties panel. Alternatively, you can set the stroke properties, then click on the Ink Bottle tool and then on the stroke to modify the stroke. For example, click
the stroke color icon (see diagram above) and select a color from the palette, then select the Ink Bottle tool and then click on the stroke to apply the color.
- To delete the stroke, click on the Selection Tool, then click
the stroke to select it and hit delete.
You can use the Selection Tool to select several items on the Stage by clicking on the selection tool and with this tool drawing a rectangle around the objects to be selected - this will select items on multiple layers.
Fill Only Drawing Tools
Exercise 3 - Using the Classic Brush Tool (3rd from the top, see diagram above)
- Select the Classic Brush Tool and draw a circle. It uses the fill color for
this shape, not the stroke color. The shape created is a fill, and does not have a stroke.
- In the Tool section of the Properties panel, change the Brush type and size.
Tools Creating Both Stroke and Fill
Exercise 4 - Using the Oval, Rectangle, and Polystar Tools - creates strokes and fills
that are independent of each other. These tools are all under a single tool - the last tool used will be the one that shows, and then the others are accessed by clicking the small arrow at the bottom right of the tool.
- Select the Oval Tool. Press and hold the Shift key while dragging --
this constrains to a circle - the circle is created using the current stroke color and the inside of the circle with the current fill color. You can set either of these to No Color - the white box with a diagonal line through it at the top of the color panel
- To create a pie-wedge shape, enter a number between 0 and 360 in the Start angle and/or End angle field.
- Setting the Inner radius greater than 0 creates an oval with a hollow center - the number entered is the percentage of the outer oval that gets removed. The settings determine whether one will see a fill color.
- Select the Rectangle Tool. Press and hold the shift key while dragging
- this constrains to a square. In the Properties panel, in the Rectangle Options section, you can set the Rectangle corner radius. By clicking the icon immediately to the right (the tooltip on hover says "individual rectangle corner radius"), you can set each corner independently of the other corners.
- Select the Polystar Tool - Click on Tool options in the Properties panel to choose between a polygon and a star, the number of sides, and the star point size
Modifying Strokes and Fills
- To use the Properties panel to change the color of a fill - e.g. use
the Selection tool to select the fill and in the Properties panel, change
the fill color
- To use the Paint Bucket to change the color of a fill - change the fill color in the Properties panel, then select the Paint Bucket and then click on the fill on the Stage to change the color
- Zoom feature: Ctrl =, or Z
click to zoom in, Ctrl - minus to zoom out, or click on Zoom Tool (the magnifying glass with plus sign) and then click the area of the stage you
want to enlarge. To zoom out, click on Zoom Tool (the magnifying glass with the minus sign at the very bottom of the toolbar) and then click on the area of the Stage where you want to zoom out.
- Undo feature - Ctrl + z (or Edit>Undo)
- To select multiple objects - Click on the Select Tool, and hold down the shift key while clicking
each
- To clear all selections - Hit the escape key
Exercise 5 - Stroke and Fill as Separate Objects
- Set the fill and stroke colors to different colors and not white - draw
an oval and then use the Selection tool to click on the fill and move it -
Animate treats the stroke and fill as separate objects.
- Move the cursor over the stroke -- a small curved line appears at the
end of the cursor - this means that you will select the line, rather than
the fill, if you click. Again select and move the line (the fill stays
in the same place). To bend the stroke and thus change the fill, just drag when you see the curved line without first selecting it.
- To select both, double click.
Interaction among Objects (Merge Drawing Model)
- Fills intersecting - if same color, joined; if different color, the second one divides the first one into sections; if the second one is moved, there will be holes in the first; if you try to move the first, you will only move a section
- Intersecting strokes - splits into segments, regardless of color of each
- Stroke intersecting a fill -- the fill splits the stroke, regardless of the color or each
Three ways to prevent this interaction:
- Object Drawing Model - Select a tool and then click the icon at the bottom of the toolbar to select the Object Drawing Model - if you draw intersecting objects, and then move one of them, you will see they don't interact with each other. You can toggle between the Merge Drawing Model and the Object Drawing Model by pressing the lowercase j key on the keyboard.
- Grouping Objects (Modify>Group) - If you create a grouped object, the parts of the object will interact with each other as specified in the Merge Drawing Model, but other objects on the stage won't interact with them. Grouped objects are useful because if you move them, the parts move together.
- Layers - Objects in different layers won't interact with each other
Creating Gradients - Animate lets you create two types of gradient fills: linear and radial.
- Make sure the Color Panel is open; if not, choose Window>Color to open it. Click the down arrow to choose Linear gradient in the Fill Style
drop down menu.
- Double click the small "house" at the bottom in the Color panel - this opens a dialog box and by selecting a color, this color
will be used as an endpoint for the gradient.
By double clicking the "house" at the other end, you can select a color as the other endpoint for the gradient.
You can click in between to add additional color stops to the gradient.
- Click on the Rectangle tool or another tool than involves a fill and draw a shape.
- Select the Gradient Transform Tool (underneath the Free Transform Tool) See how the various edit handles (center point, width handle, and rotation handle) affect the gradient.
- Now select Radial gradient in the
Fill Style drop down menu and then the Gradient Transform Tool from the toolbar - see how the various edit handles (center point, focus point, width handle, radius handle, and rotation handle) affect the gradient.
- Click on the button "Add to Swatches" at the bottom of the color panel; this adds this gradient to the Swatches panel. If it isn't open,
choose Window>Swatches to open the panel and the new gradient
should be at the bottom on the right.
It will also be at the bottom of the color palette that opens when one clicks the fill color in the toolbar or in the Properties panel and can henceforth be selected just like any color in the palette
Using the Text Tool
Select the Text Tool (a capital T) At the top of the Properties panel you will see a choice between Static Text and Dynamic Text.
To enter text, draw a rectangle after selecting the Text Tool. In the Properties panel, one can set the font, style (regular, italic, bold, bold italic), point size, letter spacing, and color (which will be the fill color if that has been previously specified with another tool). Unlike an HTML page, you do not need to worry about what fonts are on your user's machine.
If one choose Paragraph in the Properties Panel, one can set alignment spacing and margins.
Static text uses fonts available on the designer's computer. Animate converts these fonts into outlines when you publish. This means you don't need to worry about which fonts are on your users' machines; they will see the text as you designed it. However, too much text can lead to a bloated file which can slow down execution.
In Animate 2023, the dynamic text option is available for an HTML5 Canvas document, but not for ActionScript 3.0 files (the globe icon does not show up). If the globe icon shows up, one chooses between Adobe Fonts and Google Fonts.
To use Adobe or Google fonts follow these steps:
- Click on the Text tool (T) in the tools and then draw a rectangle on the stage.
- Type the desired text inside the rectangle
- Select the desired text
- In the Properties panel, click on "Tool" at the top
- In the character section, you will see the name of the current font (e.g. Times New Roman).
- To the right of this, if you are connected to the internet, you will see a globe icon - click the icon and choose either Adobe Fonts or Google Fonts.
- If you click on either Adobe or Google Fonts, pick a font.
- If your text isn't selected, select your text and then click on the dropdown - this will display a long list of fonts, but the Adobe or Google font you selected will be at the top in a category called Web Fonts.
Dynamic text uses fonts available from Typekit through your Creative Cloud subscription and fonts from Google. This avoids the large file size issue above from use of large amounts of static text.
The use of these fonts in HTML5 Canvas is discussed in more detail in two documents:
Revised: February 28, 2023, Comments to William Pegram, bill@billpegram.com