Dreamweaver Homework #1
Creating root directories, creating local sites, and defining the remote
server
Read Ch. 1, 2 and 3 of your book before you begin this homework
- Think of three websites you would like to create
- Create a root directory for each of these 3 websites
- On a flash drive or your hard drive, create a directory named WEB SITES
- Inside the WEB SITES directory, create three directories.
- The three directories will each be the root directory for a site you
will build
- Create a local site for each of the three sites
- Follow the directions in Chapter 2 of the book
- Pages 28 through 31 show you, step by step, how to "create a local site"
in Dreamweaver
- I call this "defining a site" in Dreamweaver
- By creating a local site, you are simply telling Dreamweaver where to
find the root directory, plus providing some other useful
information
- Defining the remote servers
- For each of your sites, define the remote server
- Pages 32 through 37 show how to do this
- It will be the same server for each site
- Here is the info you will need
- server name: www.student.nvcc.edu
- connect using: ftp
- ftp address: www.student.nvcc.edu
- username: nvstu/YourUserID
- password: you know this
- root directory: leave blank for now
- Create a couple pages in the each of the sites (2 .html files in each of the 3 folders for a total of 6 pages),
- Experiment, get creative
- This is your time to explore Dreamweaver
- For this exercise, save your pages using filenames that you haven't used before (you'll see why in a minute)
- When you want to switch to another site, select Site>Manage Sites.
- Now you will use Dreamweaver to upload your files to the your space on the NVCC student server
- For one of the sites (let's assume the folder name is called animals), in the Files panel, click on the site name and then either click the up arrow above it or right click on the site name and select Put.
- In the Files panel, click the icon at the far right (4 icons to the right of the up arrow) and then click on the icon at the left so you can see the files on the NVCC student server
- Notice in the list of folders, you do not see the folder name "animals". Thus when Dreamweaver uploads an entire site, only the content of the root folder of the site are uploaded, the folder itself is not uploaded.
- What does this mean for our exercise? It means that if we were to proceed as above and upload each of the three sites, all the files from the three sites would all end up in the same folder, rather than each being in its own folder. This is both disorganized and if files have the same name, will result in name clashes with files from one site overwriting the files from another site. Not good.
- Fixing the problem: We need to change the server definition for each of the three sites.
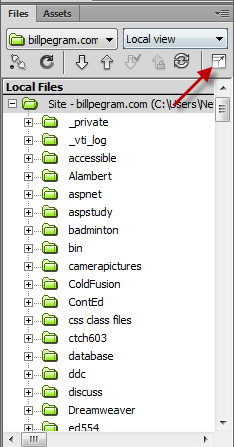
- To do this, select Site>Manage Sites and select one of the three sites. Click the icon at the far right of the Files panel (I have used an arrow in the diagram below to point to this icon)
 which will then expand the display to full screen, showing server files on the left side of the page and local files on the right side of the page. However, to see the server, files, you need to click the button on the toolbar.
I have used an arrow to point to this button in the diagram below.  We will now create three separate folders on the remote site, one for each of our sites. To do this, right click on the server name and select New Folder. The new folder will likely appear the bottom of the folder list and click it to rename it to the name of one of your folders containing a site. Repeat this process for the other two sites. (Creating these folders on the server is necessary because in the step below, when we specify the root directory on the server for the site, this folder has to exist.)
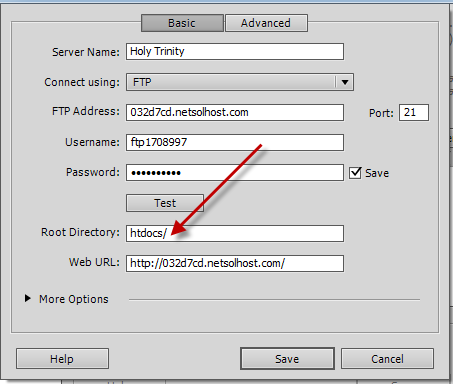
- Select Site>Manage Sites and select one of the three sites. Click the pencil icon to edit the site definition and then select Servers then click on the server name and then again click the Pencil icon to edit the server. For the root directory, enter the name of the folder you just created on the server for this site and then Save twice. (The place to specify the root directory is marked with an arrow in the diagram below).
 Now in the files menu, when you select the site name and then click on the up arrow to upload, it will upload the contents of the folder as before, but this time, because you have specified the name of the folder for the root directory of the site on the server, these uploaded files will go into this folder on the server. Thus you will have maintained the same folder structure on the server as you had on your flash drive or hard drive.
- Repeat the process for the other two folders.
- View one of your sites on the student server in the browser, and then select the URL and submit the URL on Blackboard against this assignment. Do the same for the other two sites.
Revised: February 25, 2013
 which will then expand the display to full screen, showing server files on the left side of the page and local files on the right side of the page. However, to see the server, files, you need to click the button on the toolbar.
 We will now create three separate folders on the remote site, one for each of our sites. To do this, right click on the server name and select New Folder. The new folder will likely appear the bottom of the folder list and click it to rename it to the name of one of your folders containing a site. Repeat this process for the other two sites. (Creating these folders on the server is necessary because in the step below, when we specify the root directory on the server for the site, this folder has to exist.)
 Now in the files menu, when you select the site name and then click on the up arrow to upload, it will upload the contents of the folder as before, but this time, because you have specified the name of the folder for the root directory of the site on the server, these uploaded files will go into this folder on the server. Thus you will have maintained the same folder structure on the server as you had on your flash drive or hard drive.